The objective of this Post is to create a small system, based on the Arduino platform capable of real-time telemetry, using MQTT through Azure IOT to send messages and Azure Functions IoTHubTrigger to subscribe to these notifications and be able to insert the data into Business Central.
This project used the ESP8266 chip compatible with Arduino, which also allows us to connect to the internet via WIFI and in turn connect to the DHT22 Humidity/Temperature sensor to read the data that will be sent to Business Central.
The following diagram graphically details the aforementioned design for sending messages from the ESP8266 to Business Central.
In the image that I will show next, it is the Telemetry Card Page created in Business Central that allows real-time monitoring of the data sent by the ESP8266

Below I will show first, the operation of the project, and later I will explain in detail each process involved.
Monitoring in Business Central
Project Overview
- Basic concepts
- Create an Application in Azure IoT Hub
- Creation, configuration of project in Arduino
- Azure Function
- Project in Business Central
Basic concepts
1. IoT: The Internet of Things (IoT) describes the network of physical objects, things, that are embedded with sensors, processing power, software, and other technologies to connect and exchange data with other devices and systems over the Internet. These devices range from common household objects to sophisticated industrial tools.
There are currently more than 7 billion connected IoT devices, this number is expected to increase to 10 billion by 2020 and 22 billion by 2025.
Some of the advantages of IoT:
- Package tracking / Fleet management.
- Inventory count in real time.
- Health: By receiving metrics and automatic alerts about your vital signs.
- Traffic monitoring.
- Agriculture: By implementing IoT sensors, a significant amount of data on the state and stages of soils can be obtained.
- Maintenance Management: Machine monitoring to discover maintenance issues before machines break down
- Guide manufacturing processes using IoT telemetry from industrial machiner
2. Arduino: is an open-source electronics creation platform, which is based on free, flexible, and easy-to-use hardware and software for creators and developers to build digital devices and interactive devices that can detect and control real-world objects. This platform enables the creation of different types of single-board microcomputers that can be put to different uses by the community of creators.
3. Extension INO: An INO file is a software program created for use with Arduino, an open-source electronics prototyping platform. It contains source code written in the Arduino programming language. INO files are used to control Arduino circuit boards.
5. The setup is the first function to be executed within an Arduino program. It is where the functions to be carried out by the microcontroller are set. This is where we set some criteria that require a single run.
4. The loop function is the one that is executed an infinite number of times. When the Arduino is turned on, the setup code is executed and then the loop is entered, which is repeated indefinitely until the microcontroller is turned off or restarted.
4. ESP8266: It is a low-cost Wi-Fi chip with a full TCP/IP stack and microcontroller, manufactured by Espressif. It is mainly used for the development of embedded applications in the IOT and is one of the most used with Arduino.
5. DTH22: It is a simple sensor that measures temperature and humidity, with good performance and low cost.
6. Telemetry: is an automated communication system that allows data to be collected in remote locations. It is responsible for collecting information, processing it and transmitting it to the place where the system is monitored.
7. MQTT: is a standard messaging protocol for the Internet of Things (IoT). It is designed as an extremely lightweight publish/subscribe messaging transport that is ideal for connecting remote devices with a small code footprint and minimal network bandwidth.
In the current project, we will use this protocol to send messages to Azure IoT.
8. Fritzing: is a free electronic design automation program that seeks to help designers and artists to go from prototypes to final products.
9. Visual Micro: is an Arduino IDE compatible Build, Upload and Debugging solution for Visual Studio 2022.
Create an Application in Azure IoT Hub
The steps in this sample project require an Azure subscription.
- We look for IoT Hub in the azure portal.


- Now, we created a new IoT Hub.

- Then, we select Scale Tier, for this publication I am going to use Free, which allows me to send 8 thousand messages daily.

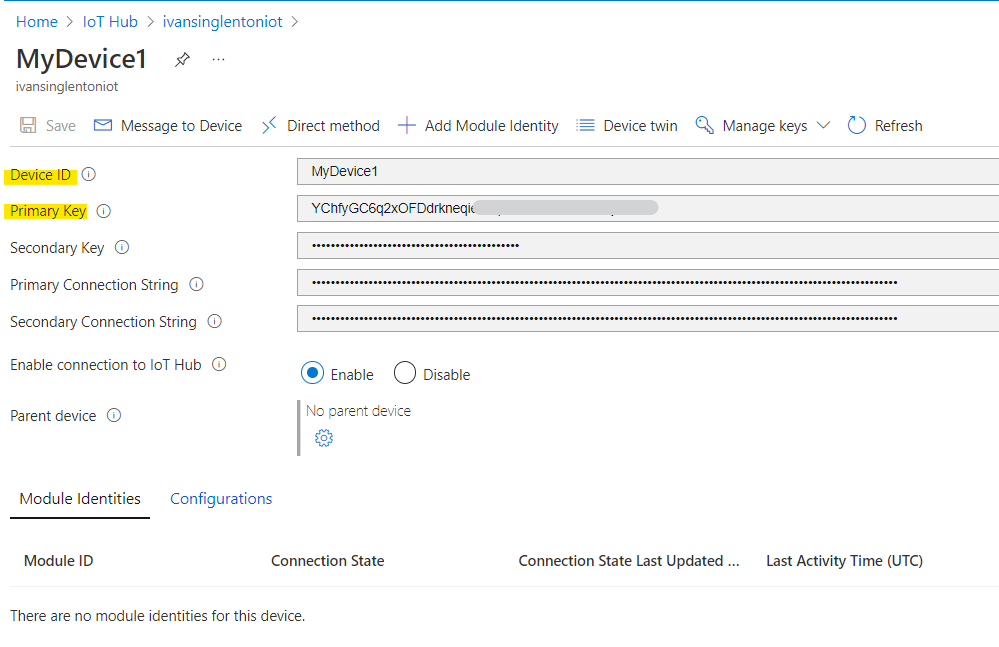
- Once the IoT Hub is created, we must create a new device, so we go to Devices Management / Devices:

- And after creating we will store the following information, which we will use within the Arduino project.
Creation, configuration of project in Arduino
Below I detail everything related to the design and configuration of the Arduino project, going from the connection diagram to explaining the code used.
Components
Here’s the list of components that I used for this project with their respective Amazon link in case you want to buy them.
- A DHT-22 temperature and humidity sensor. Amazon Link.
- 0.96 Inch OLED Display Module. Amazon Link.
- ESP8266. Amazon Link.
Fritzing diagram
Next, as a first step before starting to detail the code, I share the connection diagram used between the ESP8266, the DHT22 sensor, and the LCD screen that I use through Fritzing software.

Arduino Libraries
The following image shows all the libraries that were installed to run the Arduino project.
Note: Although the native Arduino IDE was not used to program the code, I did use it to install the following libraries:

Visual Micro
The Arduino project was created with Visual Micro, to download and configure I leave you the link to the official page of the extension.
In the same way, the files that I am going to share at the end of the post can also be opened with the native Arduino IDE.
Configuring Visual Micro and creating the ESP8266 code
The following image shows the settings I use to connect to the ESP8266 in Visual Studio.

Next, the 2 main files that contain the code and the logic that will be loaded to the ESP8266 are highlighted in yellow.

- Iot_configs.h: This is a header file, here I have defined all global variables, Azure connection strings, Wifi credentials, and libraries that will be used in the Azure_IOT.ino file and the time that will elapse between each sending of messages.
Global configuration variables:
// The following global variables will allow us to configure the WIFI.
#define IOT_CONFIG_WIFI_SSID "your SSID"
#define IOT_CONFIG_WIFI_PASSWORD "your Password"

// Azure IoT project configuration strings
#define IOT_CONFIG_IOTHUB_FQDN "mypage.azure-devices.net"
#define IOT_CONFIG_DEVICE_ID "MyDevice1"
#define IOT_CONFIG_DEVICE_KEY "YChfyGC6q2xOFDdrkneqiXXXXXXXXXXXXXXXXXXXXx" This value is the Primary Key, from step 5 of Create an Application in Azure IoT Hub

// Publish 1 message every 60 seconds
#define TELEMETRY_FREQUENCY_MILLISECS 60000- Azure_IOT.ino Contains all the logic that will control our ESP8266.
This is divided into the following stages:
- Setup Method: Here we initialize the pins that will connect with the DHT22 sensor, the LCD screen (optional), the WIFI and an internal Led of the ESP8266 that will blink when sending the information.
- Loop Method:
This method will execute what we configure in the global variable TELEMETRY_FREQUENCY_MILLISECS, for this post the value of 60000 was used, which represents 60 seconds.
Here, the first time it will enter and execute the Connect method that will initialize and connect with Azure IoT once connected, the Send method will be executed, which will be the one that sends our notifications.
Connect Method: This method will validate and configure the following:
1) ConnectToWiFi: Connect to device wifi.
2) InitializeTime: the local time of the device will be synchronized through the SNTP protocol, in my case I have configured it to my time zone, which is GMT-4.
3) InitializeClients: The client mqtt server will be initialized and configured, through the connection strings to azure previously registered in the iot_configs.h
#define IOT_CONFIG_IOTHUB_FQDN "mypage.azure-devices.net"
#define IOT_CONFIG_DEVICE_ID "MyDevice1"
The receivedCallback is also configured here, in case we want to send messages to the device.
4) GenerateSasToken: this method will generate a Shared Access Signature Token using Device_key previously configured in ot_configs.h
#define IOT_CONFIG_DEVICE_KEY "YChfyGC6q2xOFDdrkneqiXXXXXXXXXXXXXXXXXXXXx"Note: the following method was extracted from the following Microsoft repository on GitHub. I’m not going to lie it’s a bit complicated 😉 but the important thing is to understand that it generates a Token to authenticate the MQTT.
5) ConnectToAzureIoTHub: Once the Token is obtained, we can connect to Azure IoT through the MQTT protocol using the following line.
mqtt_client.connect(mqtt_client_id, mqtt_username, sas_token)Below is the complete code to connect to Azure IoT Hub.
If we put everything together, this is how the Connect Method would look like:
Send method:
This method, as already mentioned, will send notifications every 60 seconds.
To send them, we must execute the GetTelemetryPayload method in charge of making the humidity and temperature readings of the DHT22 sensor
GetTelemetryPayload: Below is how the reading of the sensor is performed, and the result is stored in a JSON variable to later be interpreted more easily when reading the data.
Other functions:
Finally, it introduces other functions that were used in the project, including:
Posting information on an LCD screen:
Auxiliary Functions:
Azure Function
The idea of working with Azure Functions is that it allows us to subscribe to messages sent to Azure IoT to later insert them into Business Central.

Required Settings
Event Hub-compatible name:
Before we create our Azure Function, which will subscribe to Azure IoT messages, we need to have the name of the event. To do this, we go to the Azure portal and look for the created Azure IoT module, then Hub Settings/Built-in endpoints, and copy the information provided by the Event Hub-compatible name field as seen in the following image.

IoTHubEndpoints:
Next, we need to copy the connection string that will allow us to subscribe and authenticate to Azure IoT. To do this, we go to Hub Settings/Built-in endpoints again, and in the Event Hub compatible endpoint section we put Services in Shared Access Policy and then we copy the connection string configured in the Event Hub-compatible endpoint as seen in the following image.

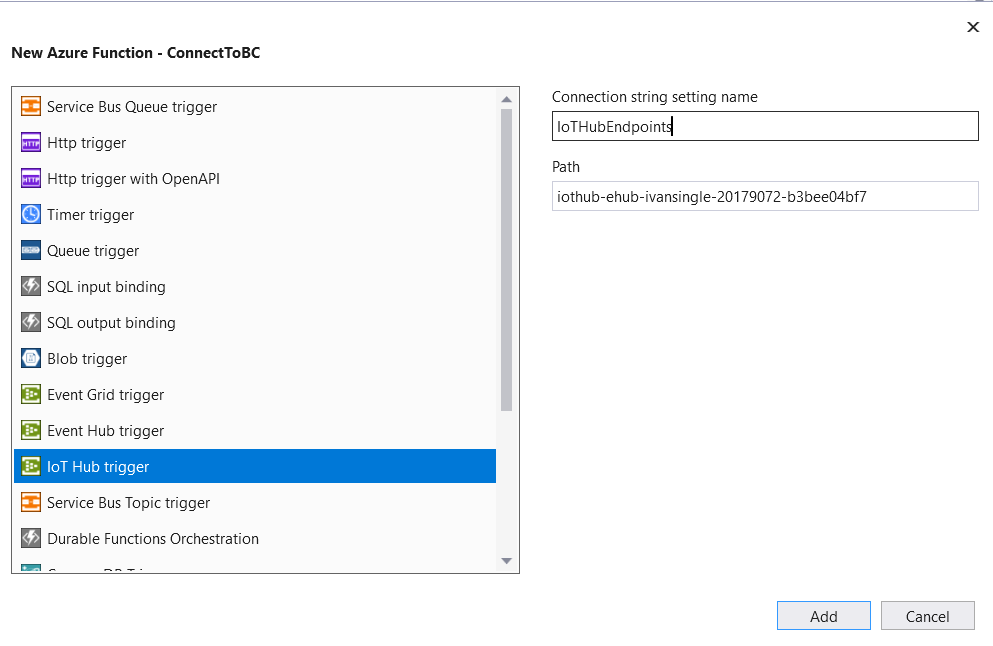
Creating Azure Function (IoTHubTrigger):
We create the Azure function of type IoTHubTrigger, and we must configure 2 values.
- 1) IoTHubEndpoints: We configure this value later in the localsettings.json.
- 2) Path: here we are going to place the information of the Event Hub-compatible name field.
Localsetting.json
Then, we must configure the values that will allow us to connect to Business Central through Oath2 (Here I leave a detailed link on how to do it), storing this information in localsetting.json.
Additionally, in this localsetting.json we are going to configure the value IoTHubEndpoints with the connection string previously seen in the previous step Event Hub-compatible endpoint.
Code Azure Function
This is what the Azure Function would look like.
Testing Video Azure Function:
As you can see in the video, when the ESP8266 blinks, the information is automatically triggered in the Azure Function that is subscribed through IoTHubTrigger
Azure Function + Pushing to Business Central
Now, I show the modified function that allows to read the message received from Azure IoT and send it to Business Central via InsertTelemetry.
InsertTelemetry
What this function does is call the BCApiServices service inside the Share project, which has the InsertInBusinessCentral method.
In the case of error or success, we notify the ILogger to be able to debug if necessary once the Function is published.
Share Proyect
I have created this Share project to connect with Business Central with the Azure Function, here we connect with OAuth2 and we can create queries, modifications, or insertions. Here I will leave the link to all the details of this Share project written in a previous post.
In this post, I will show the changes made that are the InsertInBusinessCentral method, the TelemetryIoT model, and the ConfigurationsValues Model.
InsertInBusinessCentral
This method allows us to insert the data into Business Central.
TelemetryIoT Model
This is the model that was created to deserialize and send the data to Business Central.
As you can see, I have a DateString, this is because I didn’t want the time to be changed and set to the Azure server time and not the local time that I am using and I didn’t want to spend a lot of time.
If anyone knows has already gone through something similar and has the solution, I would appreciate it if you could tell me how to configure it in Azure to keep the same Datetime. 🙂
ConfigurationsValues Model
This class will load all the constants, connection strings, and webservices published in Business Central that will allow the Share project to connect properly.
ReadEnviornmentVariable
This information that will be read in the ConfigurationsValues class will be done through the following method.
This method will read the information from 2 possible places.
- If the project is running locally from local.setting.json.
- If the project is already published in the Azure portal:

BCApiServices
The complete service, which includes the InsertTelemetry method, would look like this:
Code + Test
Once the function is published in the Azure portal, we can review what is being executed through the following route:
Function App / Functions / YourFunctionName / Code + Test
And we changed Application Insight Logs to FileSystem Logs.

Project in Business Central
This project consists of an extension in AL composed of 1 Table, a couple of codeunits and a couple of pages, which will allow us to monitor the values sent by the ESP8266.
The idea is to be able to control, for example, a product or machine that must maintain a certain temperature/humidity.
This extension shows us all the published values, the average of the temperature and humidity and its last values.
Finally, 2 Power BI reports have been created, which were used to graph the values and additionally statistical control limits based on 6 sigma were created.
Tables
As tables, we only have 1, which is where we store the information sent by Azure.
TelemetryIoT
Codeunits
We will have 2 codeunit, one that will be in charge of receiving the information from Azure, and another that will create to generate auto-refresh in the monitoring page that will be shown later.
WebServices
This codeunit receives the telemetry in json format, deserializes it and inserts it into Business Central, and subsequently notifies the result of said insertion to the Azure function.
For this project, I worked with a codeunit type web services. it is necessary to publish it in the Business Central webservices list in order to be accessed from the Azure Function.

AutoRefreshDelay
This codeunit is quite simple, it only contains 1 line of code and allows in this case 20 seconds to refresh through the Background Page, seen in the last post, the main monitoring page.
Pages
As pages, we will have a main Page Card which in turn will be made up as follows:
- Listpart that will contain the list of esp8266 device values.
- TelemetryCuePage, it will be a factboxes that will display the information of the last inserted telemetry values, and the average values.
- Power BI Report FactBox: 2 powerbi reports where the values of the Telemetry table will be plotted with quality control limits based on 6 sigma.
Telemetry List Part
This is a ListPart, which will allow the Telemetry values to be displayed on the main Card Page.
It was decided to create with a temporary table, to avoid making the minimum possible modifications in the source table and thus avoid introducing flickering
Below is an image of what the List Part will look like.

Power BI Report FactBox
Below is an image of how the 2 Power BI reports look

TelemetryCuePage
This PagePart allows us to visualize the indicators in the factboxes area of the last and average values of temperature and humidity.

TelemetryIoTCard
This page brings all of the above together. The only special thing that I can narrow down is that it uses PBT (Page Background Task) to create data auto-refresh, preventing the user from having to refresh manually to always see the most recent value.
For more information about PBT with autorefresh, I leave this GitHub link created by Microsoft.
Putting everything together we would have something similar to this:

Conclusion
Finally, an IoT project was created that allows monitoring telemetry in Business Central using Azure IoT and Azure Functions.
As we have seen, this is a way to integrate the Internet of Things with our favorite ERP.
Before closing, I want to comment that since the post was a bit long, in a new post, I will explain the details of the powerBi reports created for this monitoring system.
Code on Github:
Arduino Project + Azure Function and Share project.
I hope this has been useful to you, if you liked it please share.