Configuring the email module in Business Central On-Premises can be challenging due to sparse and sometimes confusing official documentation. This article aims to guide you step by step through the installation and configuration process, so you can complete it quickly and efficiently, avoiding common obstacles.
Introduction
Often, the official documentation omits crucial details, such as configuring the redirect URL in the Azure App Registration or the need to install certain applications from the Business Central installer folder rather than from AppSource. This article addresses these points and provides clear instructions to save you time and frustration.
Prerequisites
Access to the Business Central On-Premises installer.
Basic knowledge of PowerShell.
Access to the Azure portal to configure the App Registration.
Important Note: The user account that will be used in the email module must have an active Office 365 license.
Part 1: Installing Email Applications (if not already installed)
In On-Premises environments, all applications must be installed via console using PowerShell and not through AppSource.
Publish-NAVApp -ServerInstance BC220 -Path "C:\Users\UserName\Downloads\Dynamics.365.BC.55195.US.DVD\Applications\Email - Current User Connector\Source\Microsoft_Email - Current User Connector.app" -SkipVerification
Get the version:
Get-NAVAppInfo -ServerInstance BC220
Install the application:
Install-NAVApp -ServerInstance BC220 -Tenant default -Name "Email - Current User Connector" -Version 22.0.54157.55195
Step 5: Install “Email – Microsoft 365 Connector”
Publish the application:
Publish-NAVApp -ServerInstance BC220 -Path "C:\Users\UserName\Downloads\Dynamics.365.BC.55195.US.DVD\Applications\Email - Microsoft 365 Connector\Source\Microsoft_Email - Microsoft 365 Connector.app" -SkipVerification
Installation Path: Ensure that the path C:\Users\UserName\Downloads\Dynamics.365.BC.55195.US.DVD corresponds to the location where the Business Central installer is located. Replace UserName with the appropriate username on your system.
Getting the Application Version: The command Get-NAVAppInfo -ServerInstance BC220 is essential to obtain the exact version of each application after publishing it, as this version is required for the Install-NAVApp command.
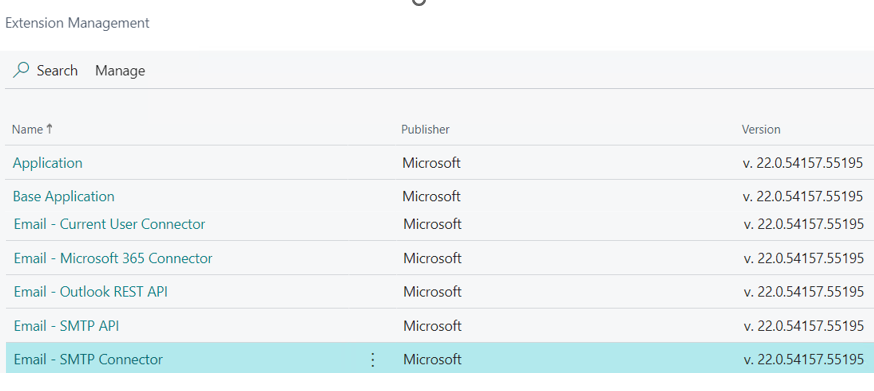
After completing these steps, if you navigate to Extension Management, you should see the 5 email apps installed:
Part 2: Configuring the App Registration in Azure Portal
For Business Central On-Premises to send emails using services based on Microsoft Azure, it is necessary to register an application in the Azure portal. This registration will allow Business Central to authenticate and authorize with your email provider through Microsoft Entra ID (formerly known as Azure Active Directory).
Step 1: Create an App Registration in Azure Portal
Access the Azure portal and go to the “App registrations” section in Microsoft Entra ID.
Create a new application registration:
Name: Assign a descriptive name to the application, for example, “Business Central Email Integration”.
Supported account types: Select “Accounts in any organizational directory (Multitenant)” to allow the application to be used in multi-tenant environments.
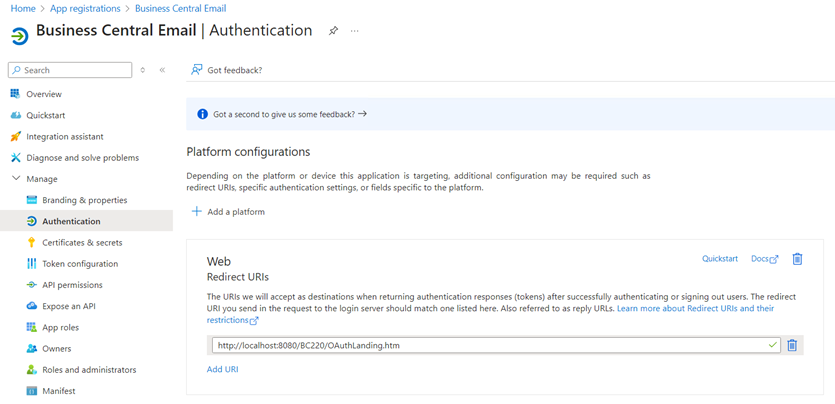
Redirect URI: Add a redirect URI that matches the one to be configured in Business Central. This URI typically has the format http://localhost:8080/BC220/OAuthLanding.htm.
Register the application by clicking the “Register” button.
Step 2: Configure API Permissions
After registering the application, you need to grant the necessary permissions for Business Central to send emails.
On your application’s page, navigate to “API permissions” and select “Add a permission”.
Select Microsoft Graph as the API from which permissions will be granted.
Choose delegated permissions and add the following minimum permissions:
User.Read: Allows sign-in and reading user profile.
Mail.ReadWrite: Allows reading and writing email messages.
Mail.Send: Allows sending emails as the user.
offline_access: Allows the app to maintain access to data you have given it access to, even when you are not using the app.
Mail.Send.Shared: Allows sending emails from shared mailboxes.
Confirm and grant consent for the selected permissions.
Step 3: Configure Permissions for SMTP Connector (if applicable)
If you plan to use the SMTP Connector and authenticate via OAuth 2.0, you need additional permissions:
Add additional permissions in Microsoft Graph:
openid: Allows users to sign in to the app.
SMTP.Send: Allows sending emails using SMTP AUTH.
Add permissions in Office 365 Exchange Online:
User.Read: Allows sign-in and reading user profile.
Grant admin consent for these permissions.
Step 4: Obtain Information for Business Central
Take note of the following details from your App Registration, as they will be needed for configuration in Business Central:
Application (client) ID: Unique identifier for your application.
Redirect URI: Must match the configuration in Business Central.
Example: In this case, we use http://localhost:8080/BC220/OAuthLanding.htm.
Client Secret: Necessary to authenticate the application.
To generate a client secret:
Navigate to “Certificates & secrets” in your App Registration.
Create a new client secret, assign a description, and set its expiration period.
Copy the secret value immediately, as you will not be able to view it again.
Part 3: Configuring Business Central to Connect to the App Registration
Access Business Central and search for “Azure Active Directory Applications” (in some versions, this may be listed as “Microsoft Entra ID Applications”).
Note on Terminology: Microsoft Entra ID is the new name for Azure Active Directory (Azure AD). Depending on your version of Business Central, the name may vary.
Initial Configuration:
Enter Application Details:
Application (client) ID
App Name
Save the Configuration
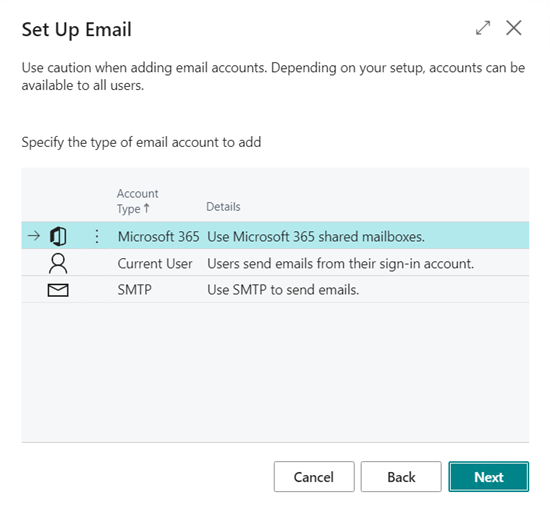
Part 4: Running the Email Setup Wizard
In Business Central, search for and run the Email Setup Wizard.
Select the account type and complete the necessary details.
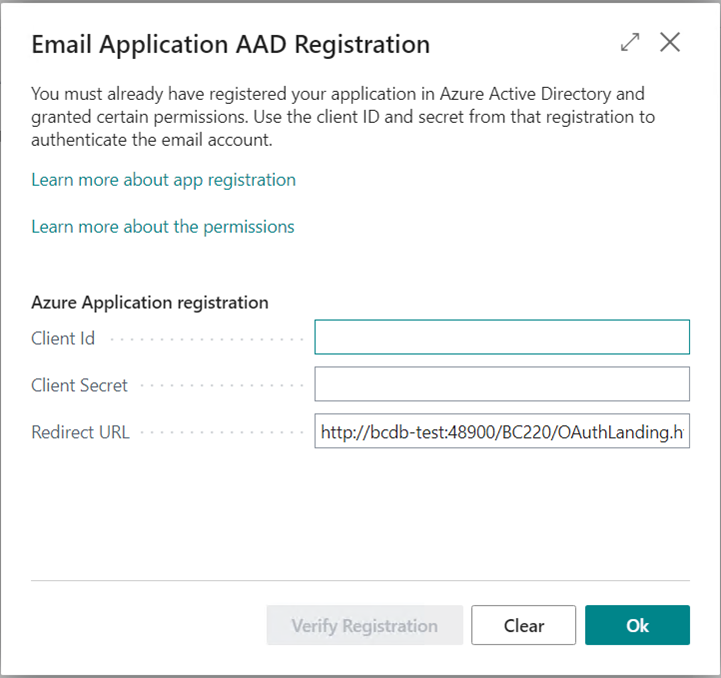
For example, select Option 1: Microsoft 365 (Shared Mailbox). Upon clicking Next, you will be prompted to enter the Client ID, Client Secret, and Redirect URI in the Email Application AAD Registration page.
Fill in the requested information with the data generated during the App Registration creation. Important Note: The Redirect URI must be exactly the same as the one used in the App Registration; otherwise, an error will occur.
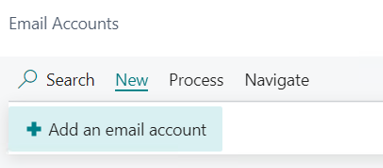
Updating the Client Secret and Other Details If you need to update the Client Secret, Client ID, or Redirect URI after completing the setup, you can do so by: – Navigating to the Email Accounts Page: In Business Central, use the Tell Me search function and type “Email Accounts”.Select the email account you are using for sending emails. – Accessing the Email Application AAD Registration: While on the Email Account page, click on the search icon (the magnifying glass) and search for “Email Application AAD Registration”.This will allow you to update the Client Secret, Client ID, and Redirect URI. – Save Changes and Verify: Click “OK” or “Save”.Send a test email to ensure the configuration is working
Verify the connection and ensure that Business Central can send emails using the provided configuration.
Additional Considerations
Consistency in the Redirect URI: It is crucial that the Redirect URI configured in Azure matches exactly with the one entered in Business Central, including the protocol (http or https).
Appropriate Permissions: Ensure that the permissions granted in the App Registration are correct and that admin consent has been granted.
Multitenant Configuration: The application must be configured as multitenant to work correctly with email services.
SMTP AUTH: If you use the SMTP Connector, verify that SMTP AUTH is enabled in your Exchange Online environment.
Azure Active Directory Applications: This page is used to link your Azure App Registration to Business Central by entering the Application (client) ID and App Name. The Client Secret is not entered or updated here.
Final Note
During the configuration process, it was discovered that all shared mailbox accounts must be authenticated directly on the server where the redirect URL is configured. It is essential that the format of the redirect URL precisely matches the server settings to ensure successful authentication. Additionally, each user who intends to use the shared mailbox account must authenticate independently on the server. This requirement enhances security by ensuring that only authorized users can utilize the email account, preventing unauthorized access and maintaining the integrity of the Business Central environment.
By following these authentication steps, you ensure a secure and reliable email setup within Business Central On-Premises, facilitating seamless communication for all authorized users.
Conclusion
Installing and configuring the email module in Business Central On-Premises doesn’t have to be complicated. By following these steps and paying attention to the details omitted in the official documentation, you can have the module up and running correctly in no time.
Remember: Always verify the versions of the applications and ensure that the file paths correspond to your specific environment.
Hi Ivan
Thanks for the guide, it helped me and I managed to configure it, I used “Current User”. However I have a small problem now, each user who wants to send email needs to authenticate and that’s fine, but I don’t know where the relationship between BC user (navUserPass) and M365 user is saved. For example, a user (user1) makes a mistake and authenticates with user2@domainx.com and I want to revoke it or wants to change his account. How can I do that?
ThankYou in advance
I’m glad the guide helped! I noticed that you mentioned using the “Current User” setup. To address your issue: are you still experiencing difficulties with users needing to re-authenticate after using the wrong Microsoft 365 account in Business Central? Or have you managed to resolve it?


Hey people!!!!!
Good mood and good luck to everyone!!!!!
Hi Ivan
Thanks for the guide, it helped me and I managed to configure it, I used “Current User”. However I have a small problem now, each user who wants to send email needs to authenticate and that’s fine, but I don’t know where the relationship between BC user (navUserPass) and M365 user is saved. For example, a user (user1) makes a mistake and authenticates with user2@domainx.com and I want to revoke it or wants to change his account. How can I do that?
ThankYou in advance
Hi Aleberto,
I’m glad the guide helped! I noticed that you mentioned using the “Current User” setup. To address your issue: are you still experiencing difficulties with users needing to re-authenticate after using the wrong Microsoft 365 account in Business Central? Or have you managed to resolve it?
Thank you!